Hypertufa Hands Tutorial

by Jacki
(Grand Forks, B.C. Canada)

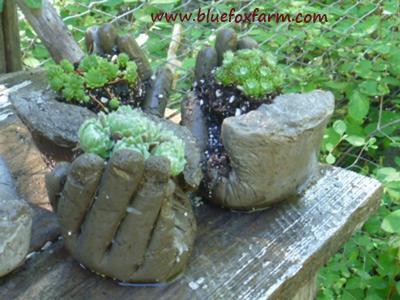
Hypertufa hand

Hypertufa hand

Well, these are a funny little project - hypertufa hands made from (what else?) surgical gloves and your favorite hypertufa or soil cement mix.

I tried with two, to see if they would work, intending to plant some of my favorite little hardy succulents in them.

I'm thinking they'll be an absolute hit!

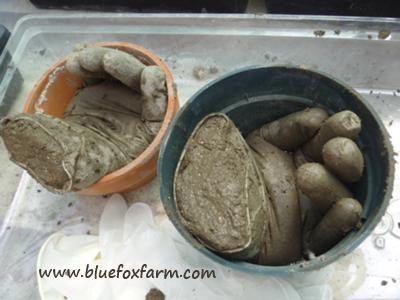
Couple of things to keep in mind - make sure there is no air in the fingers of the glove and constantly 'burp' them to get all of it out (I guess you could prick a little hole in the ends of the fingers so the air could escape - something to try next time) and then I lay mine into a pot to curve the fingers.

The other thing to keep in mind is that wherever the fingers touch, it's hard to get the gloves out, so you have to cut them with a razor blade, then carefully pull them loose.

The fingers are fragile, so be careful doing this.

Another option would be to just let the glove weather away in the sun, or carefully burn them off with a propane torch.

The place I got the idea had done them flat, which was cute too. I can see these sticking up out of a garden bed! Don't get too close, or the buried person will grab you...

See a bigger image of this project on Wikimedia.
See more on my projects with a Handful of Hypertufa Hands and a different perspective here.

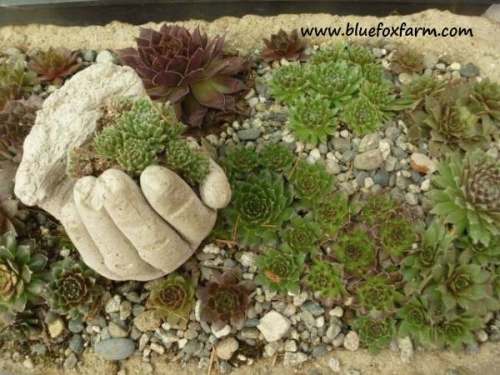
Hypertufa Hand in a planter


Hypertufa Hand in a bird cage planter


all images and text on this site are copyrighted
All images and text on this site are copyrighted

Comments for Hypertufa Hands Tutorial

Click here to add your own comments

Feb 07, 2012
tufa fingers
by: gardengirl

I just love these hand tufas------I made 3 of them.The first one which when trying to release the surgical glovewas a failure. Maybe I tried to soon. I broke off (2) fingers (the pinky and then the ring finger. I then made up some pure portland and wet the wounded areas and put them back on-------this did work. I won't be so anxious next time.Please let me know if after a couple of days, should I emerse them in a bucket of water for a week as I read which is what is advised to do with (pinch-pots.Sinserely Gardengirl.

Feb 08, 2012
tufa hands
by: garden girl

Hey please let me know if you put these little hands in water ---after a few days to cure as they do with the pinch pots. Sincerely garden girl


Hi Garden Girl - yes, you do cure them in exactly the same way by immersing them completely in water. Here is the link to more on that: Curing Hypertufa.

Apr 11, 2012
help
by: pcmom

I'm having terrible luck with the hands....the fingers are breaking off!!!! I'm using a mix of equal parts portland cement, peat and perlite. Do I need to use a stronger recipe? How long do they need to sit before removing the gloves?
ANY INFO would be appreciated!
Thanks!

These are tricky, that's for sure. I found that you can make them with less peat and perlite, which will make them stronger, and above all, don't mess with them too much until they're thoroughly cured. They take a long time to cure, so don't stint on keeping them wrapped and/or soaking in a water bath.

Others have found that you can make a little bit of mortar (just the portland cement and tiny amount of water mixed until it's like putty) and glue them back on.

I also will be trying using wire inside each finger, to make them a bit stronger. I also found that some gloves are skinnier in the fingers than others, so maybe use a larger size.

Best of luck!
Jacki

Apr 23, 2012
so creative!!!
by: brenda

love love this!!!

May 01, 2012
HYPERTUFA HANDS
by: Robbie Frazier

could you use quickcrete to make them with. I think it would be strong enough. Just wondered.

Try it, and post back here if you have success - I don't see why you can't use other ingredients and methods - I'm big on innovation and figuring things out. Luckily, with Hypertufa, there are no rules!

Aug 08, 2012
soourgical gloves
by: randy

They make a fiberglass strand product you can add, I found some at a cement co.

Aug 25, 2012
Support for the fingers
by: Robin

As a sculptor, fragile pieces need interior structure. Try making a hand shape out of a long piece of bendable wire. You'll need to bend it into the final shape you want your hand. Put the cement mixture into the fingers before putting in the wire, then slip the wire shape in place. Make sure there's cement on all sides of the wire. Fill the rest of the glove. Before it starts to set, slip a piece of cardboard between the fingers (you'll get the glove off easier if it has a little space). Hope this helps, I can't wait to try my own, and make a head with a plantable "hair" top to go with them!

Good tip, Robin - I hope you'll post your project here!

Aug 26, 2012
Boo
by: Kathy

These hands are wonderful, I will give it a try.
I pinned the photo and so glad I found your site.
Thanks for sharing. I see tons of hypertufa projects in my future.

Aug 26, 2012
using concrete fortifier
by: Anonymous

I tried one set and broke fingers off, right and left. Literally. So this next time I am going to mix 1 part portland cement and 2 parts sand and use a liquid concrete fortifier. It is supposed to make the concrete flow nicer and gives it strength and a smooth finish. Also I may throw them into a bucket after 24 hrs and not try to rush getting the gloves off. I think that there will be enough room for water to leak down into the glove and around the concrete and allow a good cure. I may after a day or so, start to gently tear away what will come away easily and wait til later to get the stuck stuff.

If you use the non-latex surgical gloves, they pretty much rot into nothing once they are exposed to direct sunlight - no need to wreck the hands getting them off!

Aug 30, 2012
More on Hand-e-work
by: Connie

Love, love, love these! I did one and it turned out ok. At least no fingers broke off! Next time I`m going to twist five pipe cleaners together and stick them in each finger before I add the hypertufa. Hopefully that will work! Next week I`m going to try and do two hands together like a person holding their two hands together to hold something in the palms of their hands. I`m going to try a bolt stuck through both of them to hold them together. Maybe slice the side of the gloves so they cure attached together as they dry. What do you think?

I will be waiting to see what happens with this - way to take it to the next level!

Aug 31, 2012
Love it!
by: Sue Green

I can't wait to try these this weekend. Thanks for the tip about a pin hole in the finger tips, that will make filling them so much easier. Just a very, very cute idea!! And I was looking for something eye catching for my soon to be planted succulent garden, this is it.

Sep 05, 2012
Try Mortar Mix
by: Barbie Car Girl

I used mortar mix, it sets quickly but it is strong and gives a smooth finish. Also, try forming the gloved fingers in a bed of wet play sand they stay propped until they are set and lift right out. Add acrylic paint to make it more interesting.

Feb 13, 2013
Love this project!
by: sandy P

I made a pair of these last year (well, I made three, but I dropped one before it was completely cured and you can imagine what happened to that!). I used Quickcrete Vinyl Concrete Patch. The vinyl additive seems to make the concrete stronger. Lots of good tips on how to make them here. If I make them again I will use bigger gloves, mine were a little small to hold the soil very well, it kept washing out when I watered them. So I made small cups of fine screen, put them in the hands to hold the soil and plants, and put some moss around the edges of the screen to hide it. Worked great! Now I have other plans to make more hands in different poses!

Hi Sandy, great tips for using the larger size gloves, and the screen to hold the soil in place. You'll enjoy my next project - promise to share it with you; it will be part of the Rustic Crafts E-Course; stay tuned!

Jacki

Apr 22, 2013
gloves
by: Anonymous

I am very much inspired by your post and all of these comments. I would like to try using long kitchen gloves as opposed to the surgical ones. Has anyone tried these?

The only issue I can think of with these is that being so much thicker, they won't bend as easily. The risk there is that they cut off the fingers or make where they're attached so thin that they are easily broken.

They also will be incredibly difficult to get off the hands; the surgical gloves do eventually break down and shred, so even if you can't get all of the vinyl off, it does come off by itself. The thicker gloves will need to be cut off with a razor blade. Give it a try, and let us know!
Jacki

May 03, 2013
Love it!
by: Inspired

I am so inspired of your work! These have so many posibilites! I do have a pond/waterfall that needs a lot of work, and I would love to make a few pairs of these cupping in different sizes for my waterfall. Is there any different products I would need as these would be wet constantly and would be more likely to corrode? And also, how could i make them join? Any tips or tricks would be greatly appreciated! You have no idea how you have inspired me! I thank you for that :) Have a wonderful day!

If they're going to be wet constantly, I would use straight concrete mix, because if it's got peat moss in they would just rot away.

You can join them by gluing them together with a bit of the concrete made into a paste; add some carpenters glue to make it ultra sticky and more plastic.

Glad you've been inspired!

May 06, 2013
Frickin Awsome
by: Granny Gee

These adorable hands have gone viral on Pinterest gardening boards. Good for you and your brilliance!!!!!!

Thanks, Granny Gee! I have more ideas, when I can get to the studio...stay tuned!

Jun 18, 2013
Thanks!
by: SueG

I just tried this with kitchen gloves and it worked perfectly. The gloves easily pulled away from the hand and I was able to tear the fingers off with no problem. I think you also get thicker fingers which may reduce breaking.

Thanks for the update, SueG - I wasn't sure if you would be able to get them off, or if you would have to cut them. What was your mix? Or is it a secret?

Jul 18, 2013
c'est ce qui s'appelle avoir la main verte
by: mamilavande

Très bonne idée, très originale, je vais essayer, d'après la photo, il s'agit de gants très fins ?

I think you're asking about the gloves? These are surgical gloves, from the pharmacy - get the cheapest ones you can find, and the vinyl ones are better for holding their shape. Hope I've answered your question!
Jacki

Jul 28, 2013
Removing the glove
by: Anonymous

I used a seam ripper to remove my glove and it worked great

Great tip - thanks for contributing!
Jacki

Aug 25, 2013
Wire in each finger
by: Ellie B.

My first attempt failed miserably. (Most all of the fingers broke off.) On my next attempt, I used Quickcrete fast setting concrete mix. I pricked a hole in each fingertip and massaged the mix into each fingertip. Then I cut wire to fit into each finger and curved it into place when they were curved in a plastic storage bowl. It worked! I had a few fingers break but they stayed in place and I just patched them at the small fracture line. I made 4 of them. Can't wait to put plants in tomorrow!

Mar 09, 2014
Use Vinyl Cement Patch
by: Brenda

I've now made four of these hands or two pairs (not sure if I will use them separately or in pairs). I used All Purpose Cement Repair, Vinyl Patch.

I only broke off one pinky finger.

I feel I got in too big of a hurry. I dried them overnight,then using a very small craft scissor I split the hands and fingers of each glove.

I then let them cure under a damp light weight kitchen towel for a couple of hours. Then to get the pieces of glove between the fingers off I used a tweezer to work them loose going from the back and then the front gently. Slipped right out. Let cure under a damp towel again until dry.

This is great fun!

Mar 29, 2014
details?
by: uncltodd

The posted pics show details of fingernails, skin wrinkles at knuckle joints, other details. Cramming mortar mix into a surgical glove won't do that. Did you carefully hand=carve after casting? Or are you using a technique and not sharing? :-)

There are no other details, it's just the wrinkles of the surgical glove - no carving required! ~Jacki

Apr 03, 2014
Broken fingers.
by: Monika

Couldn't you use stiff electrical wiring in the fingers.

May 03, 2014
Help with last steps please
by: Gwen

Can someone explain the last steps? I read of a sealer to put on, is this just a cement sealer found in hardware stores? Also, then read about putting it in water to cure the cement. After gloves come off put in cold water? for how long? then when dry apply sealer?

Gwen, I don't use any kind of sealer, so I can't speak to that suggestion at all; the water is to cure it, but you don't need to take the gloves off, as the fingers will likely be damaged in the process.

Just immerse the hands with the gloves in place, or slash the gloves a few times with a razor blade to allow the water to get in. Some people say two weeks, others can't wait that long - the longer the curing time, the stronger the hypertufa, so please be patient so you won't be disappointed when the fingers break off!

Hope that helps,
Jacki

Jul 15, 2014
Curing your "Hands"
by: Daryle in VT

I work with various forms of concrete mixes. One thing is the same, no matter what the formula is ... concrete takes 28 days to cure.

Jul 18, 2014
A couple of thoughts ...
by: Daryle in VT

Perhaps a better molding glove is the Nitrile-based worker's glove. They are usually blue, once advertised with a fork trying to push through the surface. Professionals might be able to justify a box purchase, but most major home centers sell packs of a couple of pairs affordably.

To reduce breakage of fingers, substitute Perlite for peat moss. 2 parts Portland cement, 3 parts Perlite, and 2-3 parts coarse sand is a good starting mix. Reducing sand or Perlite may improve casting. Add water only once, a little wet is O.K.

Make an artificial wrist out of one-by pine. Cut a piece 2" by 3" and clip the corners to make an oval. Sand to smooth a bit. Bore a 3/4" hole in the block. Staple into the glove. Cut off all but an inch of a very large funnel, to fit the hole. Your mix should just ooze through. Put the nitrile glove into an old leather one. Fill, then plug the hole with a cork. Drape the wet product over a duck-pin ball ... a what? ... a palm-sized ball, and allow to cure.

Manipulating the fingers will release any air in the tips. You probably should avoid Tiger Hair mixes. This product is chopped fiberglass in a cementitious mix. When cured, tiny 'glass hairs sticking out will make it more fun to toss a live porcupine back and forth, bare-handed.

Just one question, Daryle - how would you get this off? The surgical gloves work perfectly because they eventually rot off on their own, but these gloves that you're thinking of would be a bear to remove. Just a thought!

For the full tutorial about this project and many more, enroll in the Succulent Crafts E-Course on my other site

Jacki

Nov 02, 2014
Removing Gloves
by: CHRISTINA LOYOLACABRAL

What about spraying a product like Pam cooking spray into the fingers before filling with your concrete mix? I kind of think that would make removal easier.

Nov 02, 2014
Pam Cooking Spray
by: Jacki

Hi Christina, yes, lots of people use a release agent such as cooking spray for their projects, but in this case it probably wouldn't help much. The concrete doesn't stick to the latex, which is why you would use a release agent. Good thought though!

Jan 09, 2015
lubricate the gloves
by: Marie

pour some vegetable oil into the glove and hold the end of glove closed as you "swish" the oil around inside the glove, this should make it easy to just cut the glove away after the cement is cured.

Apr 13, 2015
Hands tutorial
by: Bridie

How about turning gloves inside out...coating with Vaseline...then turning right side out again before filling...should slide out very easily when set...must try this :-)

Feb 18, 2016
Tutorial
by: rous

What if you pretended I have no clue what to do here and give me step-by-step directions.

Feb 18, 2016
Tutorial with detailed step by step instructions
by: Jacki

Rous, you can buy the tutorial here - there is a video and detailed instructions, plus links to the affiliate for the supplies.

Click here to add your own comments

Return to Hypertufa Hands


Learn what it takes to be creative - we all have the gene but how do we develop it? Get the free guide!

Fill in the form below for your copy;

(Don't be disappointed - use an email address that will accept the free download - some .aol email addresses won't. 

If you don't see your download within a few minutes, try again with another email address - sorry for the bother.)

Find out more about the How to be Creative Guide

Free How To Be Creative Guide

Please note that all fields followed by an asterisk must be filled in.


Follow Blue Fox Farm on Pinterest
Follow Blue Fox Farm on Facebook
Follow Xeria on Twitter